Basic Jewelers Tools
There are three basic jewelers tools that are essential tools found in any beginner's beading hand tool kit whether you are a beginner or advanced. Let's look at these tools and see why these specific tools are so important.
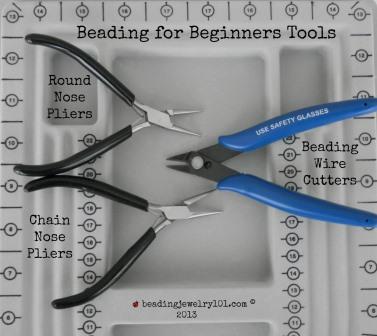
These are a minimum tools you need to make jewelry and this will be our focus.
- Chain Nose Plier
- Round Nose Plier
- Wire Cutter
There are many more tools for jewelry making, but we since we are talking basics let's start with the essential that you can not do without.
Let's discuss each basic jewelers tools for beginners, see what they look like and learn their purpose. First up...is the most used tool in your arsenal.
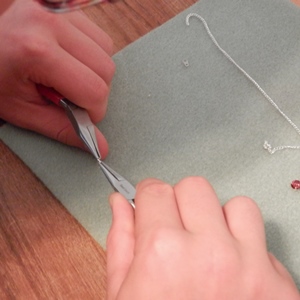
Chain Nose Pliers
The chain nose pliers will be your main 'go to' tool, the first you reach for and last to put down. This will be your most used basic jewelers tool in your starter beading kit. It will be like a second set of hands as you progress through learning the beading techniques and will become the foundation of all your tools. Having a few on hand will more than likely become your normal.
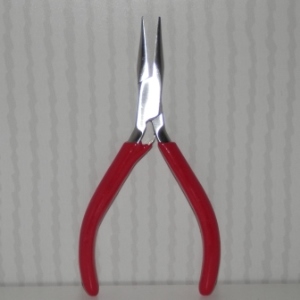
Looking closer you see the chain nose plier has a tapered nose that narrows to a finer tip. This is necessary for some of the fine detail work you will encounter. As you move into the tutorials and begin working on projects you will see how valuable this little detail is.
The chain nose plier resembles an ordinary pair of household pliers but for your benefit learn the difference. These do no come from the tool section of a hardware store. These pliers are jeweler's tools and found in the beading aisles of your local hobby, craft or bead shops.
Beading Tip:
Running your finger along the inside of the nose of the chain nose pliers you should feel a smooth, polished like surface.
If there are teeth or it feels rough to the touch, this will be in direct contact of your materials and may mare your jewelry.

The chain nose beading tool has a smooth high polish finish on both the outside of the nose as well as the inside. This tool has many uses although the main purpose will be to compress a crimp bead in your beginning projects which we will talk more on when we begin discussing the two basic beading techniques.
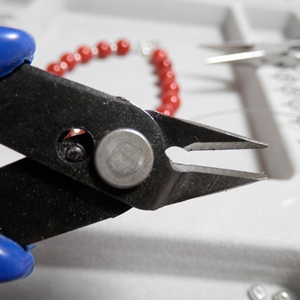
The second most used tool in your basic jewelers tools arsenal are wire cutters.
Wire Cutters
The wire cutters are used to cut the stringing materials for your beading projects.
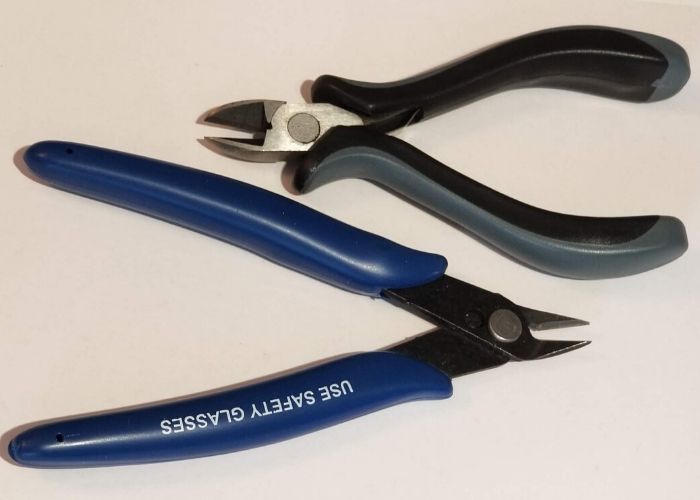
Wire cutters may be addressed by a variety of names; nippers, side cutters or flush cutters based on the type of cut you want to achieve. They are available in a variety of strengths when cutting the different thicknesses of wire you will eventually be using in your jewelry making.
Let's make the distinction.
Stringing necklaces and bracelets uses a light weight flexible beading wire where as materials used in creating earrings uses a stiffer gauged wire. The thicker the gauge of wire, the stronger the wire cutter needed. Pay attention to the difference of the strength of your tool.
Caution should be used here, it is important to have the right cutter for the right job. We will discuss more differences between the different wire cutters as we move on to more projects.
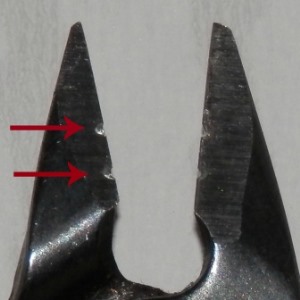
If a cut is made on heavier gauged wire using a cutter intended for lightweight flexible stringing wire you run the risk of damaging your tool. So exercise caution at all times.
Pictured here is an example of what can happen when not using the right tool for the right job. Lesson learned.

Beading Safety Tip:
Wire cutters are sharp tools and will cut flesh if not used properly. Please use extreme caution and always, always make sure you are using the right tool for the right job. Thank you for your attention to this detail, we now return you to your regular programming.
The last of the 3 basic jewelers tools is the...
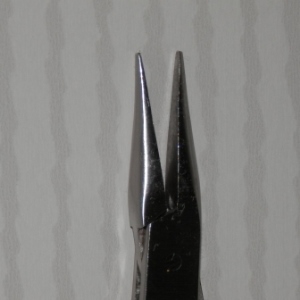
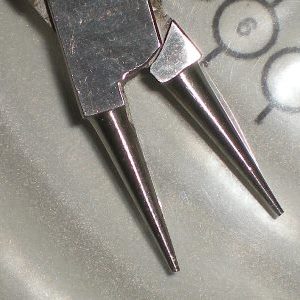
Round Nose Pliers
The third and final basic jewelers tool to complete our beginner's tool kit is the round nose pliers.
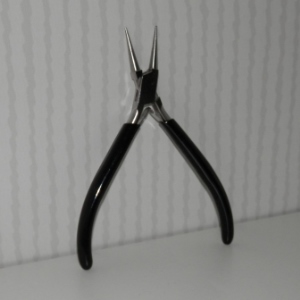
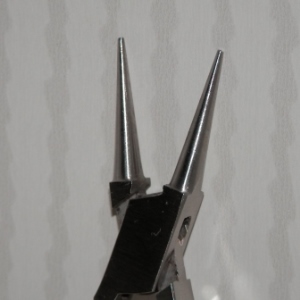
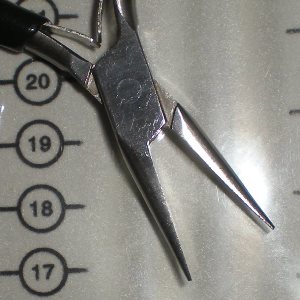
The round nose pliers have a strong resemblance to the chain nose pliers but they are quite different. Make a special note here, they are so similar that they are constantly confused.
The difference?
The round nose pliers nose is completely round intended make loops, circles, curves and soft edges when using sculpting wire. Take a close look at each picture to compare the round nose pliers vs. the chain nose pliers.
Round Nose Plier
Chain Nose Plier
Do you see the difference?
The round nose pliers are used to create loops, either a single loop or wrapped loop, with the head or eye pins used in making earrings or charms.
The tapered jaw allows for creating variegated sizes in loops depending on what your project or design calls for. We will look more at these variegated sizes as we move into more projects that will require making loops.
Make the distinction between these tools now.
As you do a task take your time and pay attention to which tool you are picking up.
Beading Tip:
If the handles of your pliers are the same color, then color code them. This is a fun excuse to use some of the fun duck tape or washi tape that is available on the market. I can't stress enough the importance of using the right tool for the right job.

Let's Recap...
Basic Jewelers Tools
Chain Nose Plier
Used for compressing crimp beads and holding objects like a second hand.
Wire Cutter
Used for cutting wire and other stringing materials.
Round Nose Plier
Creates loops with head pins or eye pins to create drops, charms and earrings.
These three basic jewelers tools should be found in any beginner's beading tool kit. All of these tools can be found at any local hobby, craft, or bead shop. Don't have one of those in your area? Let's head to Amazon, one of our online source that carries beading supplies. The cost is relatively affordable for mid-grade tools, which is where we recommend you begin.
We use Beadsmith tools in our face to face classes. They have served us well and are a nice brand of hand tools. They may run you between $8 to $12 range depending where you purchase them, which is very affordable for as much as you will be using these three basic jewelers tools.
There are higher grade tools available, but our recommendation for beginners is to get your footing before you invest too much money up front. Make sure you are going to enjoy this process. Once you are comfortable using the tools and have mastered the basic techniques you might consider investing in the high-end tools.
This is our 'Been There, Done That' advice. We still use these three basic jewelers tools over the years with teaching classes and our own use. They have been worth the investment.
To get your set of these basic tools here is a Betty Beader recommendation.
The BeadSmith brand offers the basic jewelers tools plus a few more tools that you will use with jewelry making. Extra pliers always good to have on hand.

We especially like this specific tool kit for two reasons:
- We prefer The BeadSmith brand of hand tools for their durability. They have lasted us for years.
- This kit provides two different wire cutters which is essential for the different wires you will be working with.
One cutter is used for cutting flexible beading wire while the other is a good selection when making earrings using head pins. Plus this set is nicely tucked away in a handy storage case.
We have looked at a variety of other tool kits available but we strongly feel this 9-pc tool set, in addition to the carrying case, is worth the value. That makes each tool moderately priced and less than if you were to buy each tool individually. This tool kit gets the Betty Beader Seal of Approval.
Now let's talk about one more tool you will need for your starter's kit.
Beading Mat and Beading Board
There two additional tools you will use with each project...
A beading mat is used to provide a cushioned work space to prevent your materials from rolling onto the floor. Beading mats can be anything from a dish towel, hand towel or a scrap piece of fabric from your home.
Or you can use these pre-cut mats shown here for your projects. These mats can be found in the beading supplies aisles of hobby craft stores and are made of either felt or fleece.
We have tried several over the years and prefer the fleece. We keep several on hand for our beading classes. These fleece type mats wash up nice and do not peel. But reality is any cushioned surface will do the job.
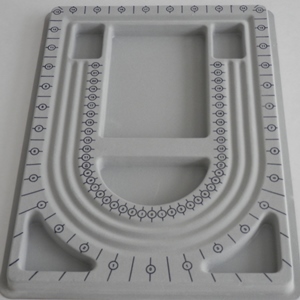
One additional tool we want to introduce...the 'bead board'.
A bead board is a pre-formed plastic rectangular board with grooved channels to help you lay out your patterns and small compartments that allow you to hold your jewelry making supplies.
The molded plastic gently holds its shape when lifted from your beading area for easy storage for those in-process projects.
As you see the bead board serves multiple purposes; a cushioned work space, storage for unfinished projects, measuring your stringing materials and laying out your patterns.
It is a handy tool to have available for your projects and very reasonably priced generally under $10 U.S. dollars, based on the size and features of the board.
We have listed both of these recommended items, for your convenience, that we have found available. This specific beading board listed sports a lid for the added convenience of capturing all your materials.
Let's Move to the 2 Basic Beading Techniques
Now that you are aware of the 3 basic tools let's unveil the 2 simple techniques that takes you from beading nothing to beading something.
These two topics...
- basic jewelers tools
- basic beading techniques
...combined with the jewelry making supplies will make your project list and your creativity a bottomless source for creations.
Once the basics are understood there is no limit what you can do.
Let's continue on where we will discuss and break down the essential materials needed for creating the countless beading projects that will begin flowing from you as you learn

Available Now at Amazon.com
The step by step book that shares a quick path to begin your beading journey.
Use 3 tools and 2 techniques to take you from beading nothing to beading something.
Bead At Home Swag
"My Birthday Rocks!"

This and more available now at Bead At Home Store
Recent Articles
-
Inspire Jewelry Making Ideas
Aug 16, 21 08:46 PM
 Inspire jewelry making ideas with 5 ways from day to day life just by opening your eyes and looking around you.
 -
Scrabble DIY Jewelry
Jul 09, 21 03:33 PM
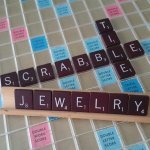 Scrabble DIY Jewelry celebrates Scrabble Day April 13 with easy to make jewelry.
 -
What is Beading?
Jun 23, 21 02:13 PM
 What is beading? Learn and understand different aspects to beading to narrow your search for what you want to learn.
Jewelry Making Classes Online

- Home
- Jewelry Tools
This site contains affiliate links to help keep our community free to you. Bead At Home and Beading Jewelry 101 may earn revenue based on affiliate relationships and advertisements with partners including, Amazon, eBay and Google. There is no additional cost to you and it helps us continue to offer this content free to our community. Thank you for your consideration in supporting our efforts.
Copyright© - Bead At Home / Beading Jewelry 101 - All Rights Reserved