Beaded Bracelet Tutorial
This is a beaded bracelet tutorial to get you started learning how to make jewelry. This is one of two basic beading techniques we feel you should learn when starting your jewelry journey.
This is also the exact same technique used in 'My 1st Beaded Necklace' but with just a few extra steps added to get the custom fit for your wrist.
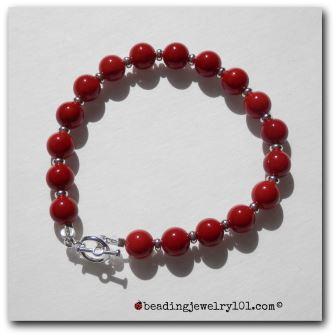
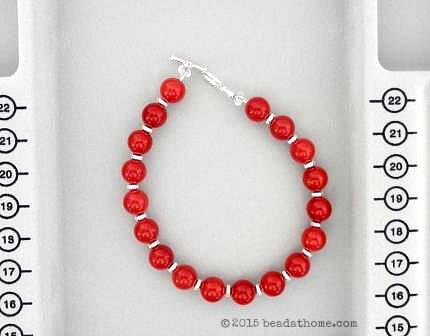
The picture you see here will be our finished project for this beaded bracelet tutorial.
Follow the step-by-step guide to complete your project, and then we invite you to share your experiences with us. We enjoy hearing from you.
Before you begin, make sure you understand the basic bracelet beading supplies and jewelers' tools you will be using to complete this project. Head over there now before you move on...it's okay; we'll wait.
But if you are ready to see how to make your first beaded bracelet, let's get started.
How to Make a Beaded Bracelet
The following beaded bracelet tutorial is just the fundamental steps to constructing a very basic beaded bracelet.
As discussed on the previous page, bracelet supplies, when designing jewelry, pre-planning your bracelet will determine your outcome for the correct fit to your wrist.
Pre-planning includes:
- The size of the beads in your design...
- Clasp selection...
- The pattern of the piece of jewelry...
The example used in this beaded bracelet tutorial has already been pre-planned for a custom fit to any wrist simply by adding or deleting beads. Ready?
Let's Get Beading with your first beaded bracelet tutorial.
Beaded Bracelet Tutorial
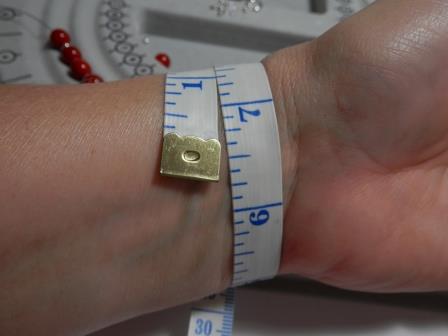
Step 1: Measure the Wrist
Measure your wrist to pre-determine the approximate number of beads needed for your design. Do your calculations from this handy chart. It makes it easier when calculating the number of beads needed for your projects.
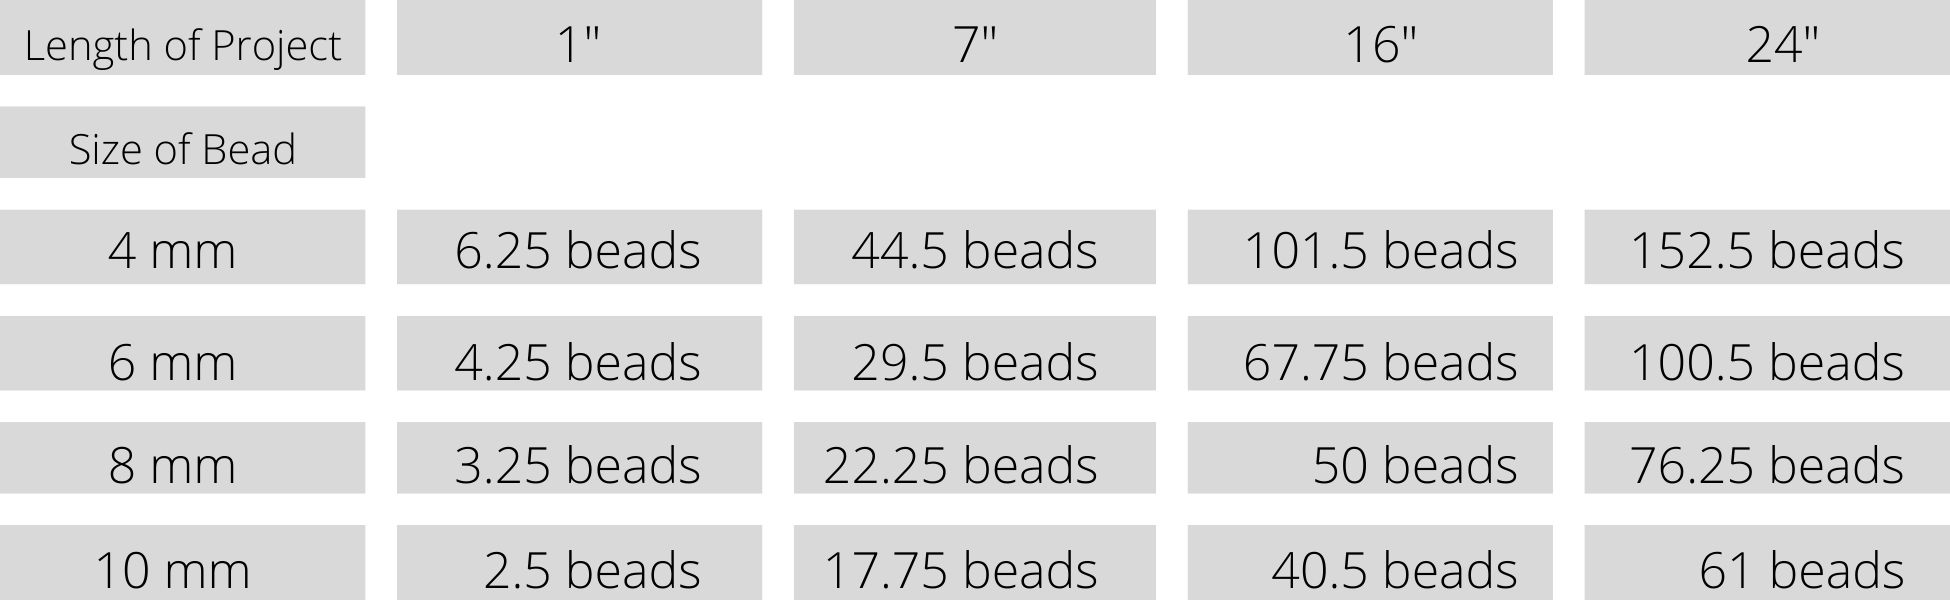

Quick Tool Recommendation: The chart and other useful quick references we discuss is found on this business card-sized handy chart card. Having it right at your fingertips allows for easy access anytime. Keep one handy for all your calculations. It's a perfect little tool to add to any beginning beading tool kit. This is available at Amazon.
Keep in mind, your wrist measurement is not your finished length. This is just to get an approximate count of beads needed. This wrist measures approximately 6 1/4 inches. The bracelet should finish out to about 7 - 7 1/4 inches for a comfortable fit with the beads and clasp selected.

Keep a pretty little retractable measuring tape in your beading kit stash for measuring your wrist or beading wire. They are soft to the touch and so handy to have. We find it helpful to keep a few on hand with our beading supplies, our bedside nightstand and always one in our purse. You just never know when you will need it. This is also available through Amazon.
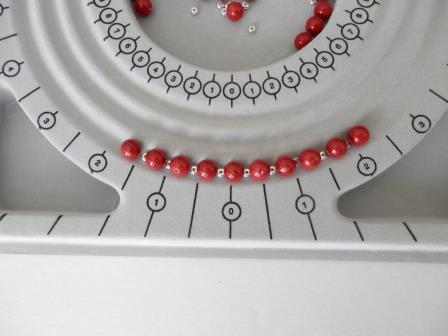
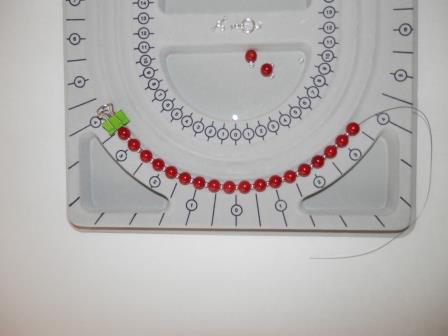
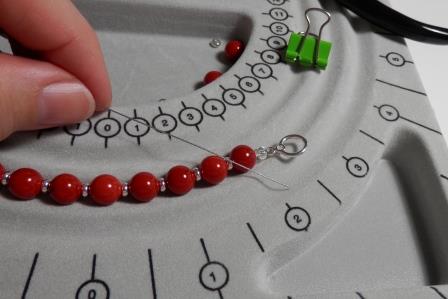
Begin laying out the pattern on your work surface. You want to get a feel for how it will look. The pattern for this specific project is the 'repeat pattern' we discussed in beading designs. We are using a beading board to lay out the pattern.
For our beaded bracelet tutorial, we used 8mm beads accented with silver-plated rondelles or spacer beads.
Step 2: Prepare to String
Measure and cut flexible beading wire using a wire cutter. Allow an additional 5 inches to your finished length. A 12-inch length is sufficient to get the job done for most single strand designs with any wrist size. Regardless, always be sure to allow a minimum of 5 - 6 inches of extra soft, flexible beading wire.
Temporarily close off one end of your beading wire using a clamp of your choice. This needs to be secure enough so that beads will not fall off the stringing wire as the project is moved about.
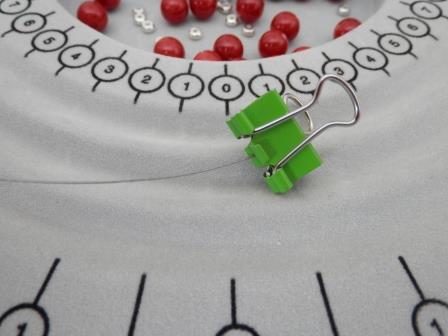

Bead Buddy Brand offers this package of 8 sturdy bead stoppers. You will find an assortment available online. These specific grippers make for an easy hold, especially when taking the bead stopper on and off, and provides a firm grip on the flexible beading wire. These are available at Amazon.
Begin stringing your beads until you reach your desired length.
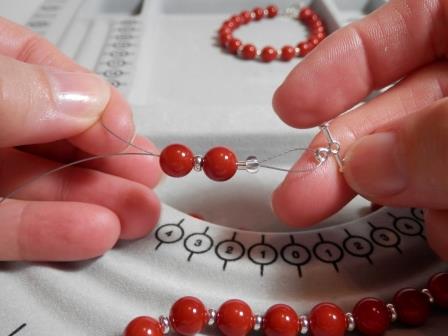
Step 3: Close First End
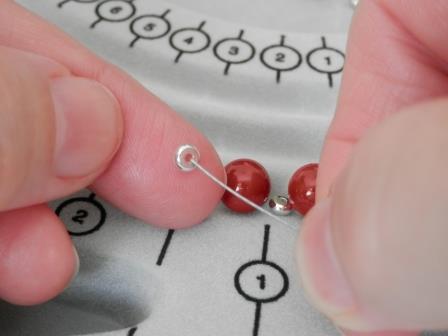
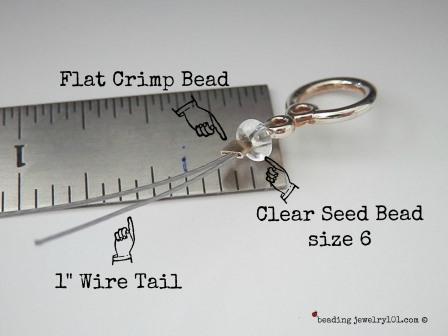
Time to close the first end. Begin by adding a crimp bead, a seed bead, and one part of your clasp. [It does not matter which clasp part you begin with.]
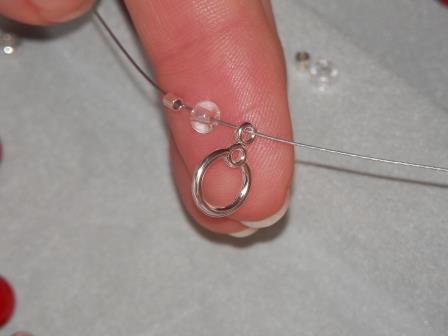
Run the wire back through the seed bead and then the crimp bead. This creates a loop to hold the clasp. Leave approximately a 1" tail of the beading wire.
Hold the crimp bead and the seed bead with one hand, pull the longer beading wire with your other hand to move the beads close to the clasp while still allowing the clasp to move freely.

Beading Tip:
Conserve as much of your beading wire initially, so there is more wire to work with on the other end.
It will make it easier for you to handle.
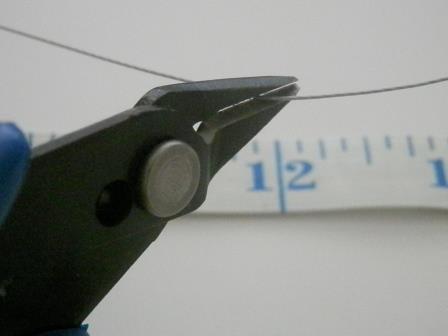
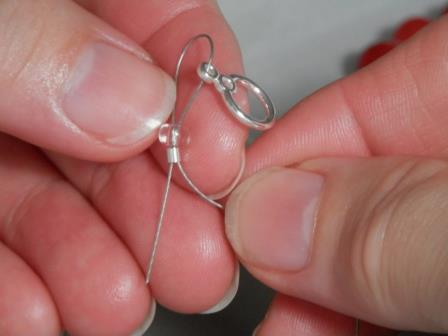
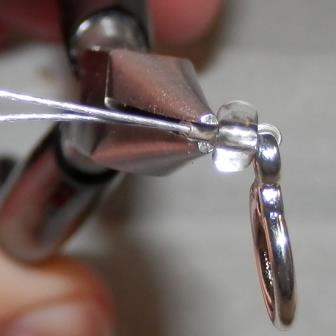
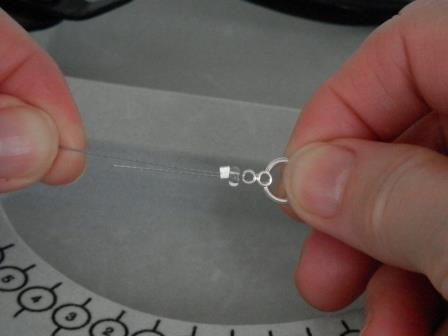
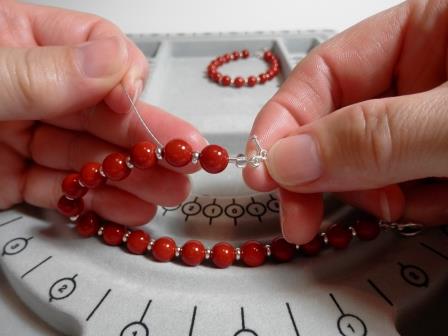
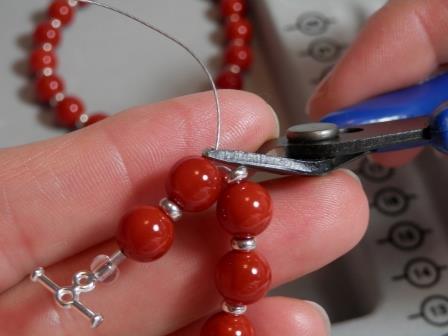
Now you are ready to compress the crimp bead with the chain nose pliers. Make sure the clasp moves easily from side to side before squeezing the crimp bead.
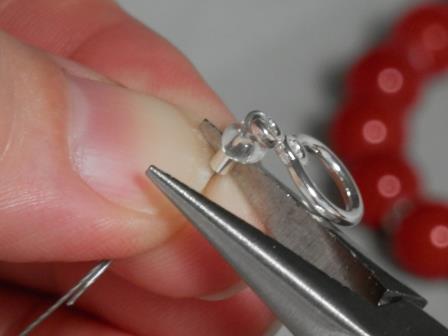
Compress the crimp flat.
Here is how your first end will look.

Beading Tip
Remember the crimp bead is the only thing holding your bracelet together. It needs to be secure. Test the security of the crimp bead before you move on.
Make sure the crimp is secure. Hold the clasp in one hand and the long beading wire in the other hand, now tug against each end. If the wire does not shift, then the crimp bead is secure.
Beading Tip
Base metal crimp beads vs. sterling silver crimp beads require a different touch.
Base metal may need a more substantial compression. In contrast, sterling silver is a softer metal and will compress with a lighter touch.
Keep this in mind as you experiment with your choice of metal for crimp beads.
Step 4: Prepare to Close Second End
Once the first end is secure, move the beads to meet the crimped end making sure the 1-inch tail is tucked inside the beads as you prepare to close the remaining open end.
Begin by repeating the same process as before. Add crimp bead, the seed bead, and the remaining part of the clasp.
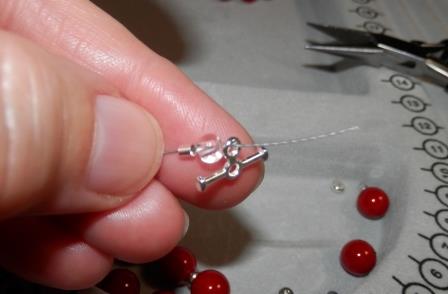
Run the beading wire back through the seed bead, the crimp bead in the opposite direction, creating a loop to hold the clasp. But this time, also run the wire thru two to three beads or approximately 1-inch of beads.
While holding the wire end in one hand and the clasp, pull the bracelet together until you have no wire showing.

Beading Tip
WARNING!!! Do not compress the crimp bead at this point. There is one more step.
Step 4a : Try the Bracelet on
Gently and carefully try the bracelet on to double-check for the correct sizing on your wrist.
With the end not permanently closed, this is the time to make any size adjustments, either increase the size if too tight or decrease the size if too loose.
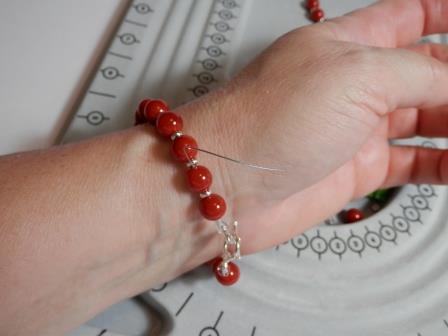
If you need to make any adjustments, just un-string the open end you are working on and either add or remove any beads as necessary. Then repeat the step again for attaching the clasp.
Bead Tip:
IMPORTANT!!
Another reason for trying the bracelet on is to allow for the natural flow and curve of your wrist.
If you remove the bracelet from your wrist before compressing the crimp bead DO NOT re-tighten the beading wire.
Did you get a good fit or adjusted correctly? If so, then you are now ready to permanently close the remaining end of your bracelet.
With the chain nose pliers, compress the crimp bead to create a flat crimp again.
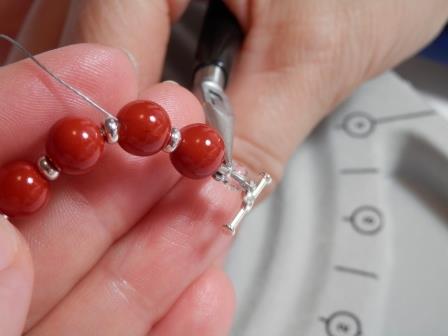
Test the strength of the compressed crimp. Hold each clasp on either end. Pull against each other to ensure there is no shifting and the bracelet is secured on the beading wire.
Remember, this is the only thing holding your bracelet together, and it must be secure. Don't be afraid if it comes apart. It's best to happen in your workspace.
It's called quality control.
Step 5: Clean Up
Okay, let's clean and trim. Trim the excess wire as close as possible with the wire cutters. Place the flat side of the wire cutters to the bead where the extra wire is protruding. Carefully snip the wire. Make sure to cut the correct wire.
Step 6: Admire a Job Well Done!
CONGRATULATIONS!!
You just completed your first beaded bracelet tutorial and you did it yourself! Now it's time to admire a job well done!!
Did you do a bracelet in the beaded bracelet tutorial? How does it fit? What, if any, adjustments would you make next time? Would you do anything differently?
If for any reason it did not turn out as you had hoped, don't be concerned, it was your first attempt. Hopefully, there are many more to come. Be forgiving of yourself, and don't be discouraged. Remember, practice makes perfect, and the more you practice, the more accustomed you become to the techniques.
Are you ready to try another one? Then let's get busy....

Any Questions on the Beaded Bracelet Tutorial?
If we did our job, moving through this beaded bracelet tutorial process was precise and clear to you. If you still have any questions we invite you to reach out if you do have any additional questions.
In the meantime, if you would like to move onto the other basic beading technique, the single loop, sometimes called the plain loop, then move onto that. This is the technique mainly used to make earrings.
We'll cover the same information; supplies, tools, anatomy 101, and then the beading tutorial to help you on your way. Once you complete the second technique, the sky is the limit for what you can create.
Now for Beaded Earrings and learning to create a single/plain loop. See you there...

Available Now at Amazon.com

The step by step book that shares a quick path to begin your beading journey.
Use 3 tools and 2 techniques to take you from beading nothing to beading something.
Bead At Home Swag
"My Birthday Rocks!"

This and more available now at Bead At Home Store
Recent Articles
-
Inspire Jewelry Making Ideas
Aug 16, 21 08:46 PM
 Inspire jewelry making ideas with 5 ways from day to day life just by opening your eyes and looking around you.
 -
Scrabble DIY Jewelry
Jul 09, 21 03:33 PM
 Scrabble DIY Jewelry celebrates Scrabble Day April 13 with easy to make jewelry.
 -
What is Beading?
Jun 23, 21 02:13 PM
 What is beading? Learn and understand different aspects to beading to narrow your search for what you want to learn.
Jewelry Making Classes Online

- Home
- My 1st Bracelet
- Beaded Bracelet Tutorial
This site contains affiliate links to help keep our community free to you. Bead At Home and Beading Jewelry 101 may earn revenue based on affiliate relationships and advertisements with partners including, Amazon, eBay and Google. There is no additional cost to you and it helps us continue to offer this content free to our community. Thank you for your consideration in supporting our efforts.
Copyright© - Bead At Home / Beading Jewelry 101 - All Rights Reserved